Fender Deluxe Reverb Electronic Restoration Part One
I mentioned in an earlier post that I restored my 1971 Fender Deluxe Silver face Reverb’s electronics. Over the next few posts I am going to let you see how I did it. I hope this is useful information for you. The deluxe reverb, Twin reverb, Super reverb all have nearly the same design so what I am saying is true of all of these lovely amps. it also applies to tthe Blackface amps too but NOT the re-issue amps as the layout is different
My amp spent a lot of time with me gigging all over Scotland and North England. This was in the 1970’s and 1980’s. Everyone smoked ( I did not smoke). The result was that when I removed the amp chassis it was covered in tar. The turret board was covered too ( more about this in part two)
This was a sticky brown ” gunk” all over the chassis. I used car paint blemish remover called T-Cut from the metal chassis abd the tube covers. It worked a treat.
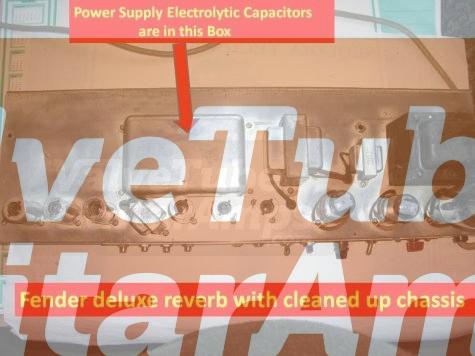
The picture below shows the chassis after I had cleaned it. The picture shows the box on the chassis where the electrolytic capacitors are located for the power supply. These should be replaced every 5 to 10 years.
1971 Model
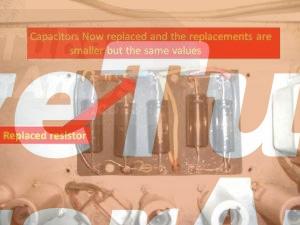
I polished the amp up after I removed the electrolytic capacitors. In the picture below you can see the capacitors exposed. WARNING: Before removing this cover leave the amp for a few hours to ensure these capacitors are discharged. Some of them can have 450 volts on them, and they can give you one hell of an electric shock. The reason there are several is because the tubes all work at different voltages with the output valves using the highest voltage. You can see here I replaced one of them in the past when it failed, and it was now time to replace them all . After all, they had been giving good service for over 40 years! What can accelerate the need for replacement, is the situation where you do not use the amp for many months, or even years. High voltage Electrolytic capacitors deteriorate over time unless regularly used. I have seen examples go off with a massive bang, when not used for several years. Replace them with the same values as you see marked on the ones in this box. Use a minimum of 600 volt rated capacitors.Take care to insert them the right way round or they will go bang. The positive and negative ends are marked on them.
The picture below shows the capacitors replaced . Note that modern capacitors are much smaller than the original units althought they are the same values. I checked the resistors in the box and one of them had gone high in value. This is what is normally expected with old carbon composition resistors as they age. This is especially true if they are dissipating quite a large percentage of the power that they are rated for.
I will continue the next piece of the work on my next post……..in a few days


I just Favored your posting quite a lot. I will be searching your website continually. I stumbled onto the application on line, does one quite often enhance your site?
Hi there
I post on average every two or three days. I only post when I have something useful to say. Thanks for visiting. Just starting on a VHT amp.
cheers
Stewart